Pages

Showing posts with label Cooking. Show all posts

Saturday, December 29, 2018

Millionaire shortbread

I made millionaire shortbread today.  If you don't know, it's a bar cookie with a layer of shortbread, a layer of toffee, and a layer of chocolate.  It's amazing.

But I thought I'd post because I combined two different recipes, and I'll never be able to remember which those were if I don't write them down!


Shortbread (from here)

2 sticks (1 cup) salted butter, at room temperature
1/2 cup granulated sugar
2 cups all-purpose flour

Cream the butter and the sugar and then mix in the flour.  Put in a big pan (I used my 9x`13 pyrex) and bake at 350 for 18-20 minutes.

Tip: you need to do this part first.  I didn't, which caused problems later.  Get the shortbread in the oven before starting the toffee.

Toffee (from here)

1 cup (2 sticks) butter
1 cup sugar
pinch salt

Melt the ingredients together in a heavy pot on medium heat, stirring often.  In about 20 minutes it will turn brown and reach 290-300 degrees.  It's done now and you need to immediately assemble the millionaire shortbread.

Assembly

Pour the toffee over the (hopefully done and slightly cooled) shortbread.  Sprinkle chocolate chips over the top.  Wait for them to melt and then spread the melted chocolate over the toffee with a spoon.  Cut into squares while it's still warm.  Let cool for at least an hour.


I highly recommend these if you, like me, feel like you haven't yet eaten enough decadent food this season!

Saturday, December 22, 2018

Solstice soup and the carbon cycle

I've been celebrating solstices and equinoxes, in a quiet way, for three years now.  I know it must have been in a quiet way, because although I definitely have been posting about it on facebook, my own husband thinks "nobody celebrates Solstice."  Ha.


I like astronomical holidays because they are for everyone.  You don't have to believe any given thing; the sun still moves the way it moves.  And it brings a lot of thoughts and reflections: about darkness and light, about change, about the cycles of life.

In my epic fantasy series (still mostly a series of outlines) the people celebrate four feasts for the four elements.  Spring equinox is the Water Feast, celebrated by dancing in the fields, preferably in the rain, and announcing engagements; summer solstice is the Air Feast, celebrated by lots of singing and flute-playing, and also weddings; autumn equinox is the Earth Feast, celebrated by eating a lot of harvest foods; and winter solstice is the Fire Feast, celebrated by bonfires and staying up all night toasting things on the fire and singing carols.  I like making up fantasy religions.

Unfortunately I can't actually adopt their customs without a tribe of people to do them with me, though I still do like the idea of spending Solstice burning fires.  Our fireplace is still not usable since we need to get the chimney cleaned, so I just lit a bunch of candles.

This year my big thought was about the carbon cycle.  It's not something I really understood until recently, with the help of some science fiction books about terraforming and a lot of news articles about climate change.  What we hear in school is that plants turn carbon dioxide into oxygen.  But somehow I never thought where the carbon goes.  Of course the carbon, together with the water the plant absorbs, become the body of the plant, largely in the form of hydrocarbons--carbohydrates, cellulose, even fat.  That's how the plant stores its energy.  When you eat the plant (or any animal does) you release that energy again, but to use the energy you put the carbon back into the oxygen you breathe, which makes carbon dioxide.  (I'm totally leaving out the nitrogen cycle here, which is also super cool.)

But!  Not all of that hydrocarbon gets eaten by people.  Some of it decays, so that the carbon goes back into the atmosphere--that's why you can't reduce the carbon dioxide in the atmosphere just by planting things and cutting them down.  To reduce carbon dioxide, carbon has to be sequestered--either by large living plants keeping it in use for a long time, or by burying it deep in the ground where it can't be released, as in coal, oil, and natural gas.  The stores of carbon deep in the earth are the result of millennia of carbon sequestration, which gradually reduced the carbon in the atmosphere until it reached modern levels.

That stored carbon is a mixed blessing.  On the one hand, you can get all that energy--millennia of sunshine, all stored up in the carbon.  On the other hand, you can bring our atmosphere very suddenly to prehistoric levels of carbon dioxide.  We have to be very careful and respectful when it comes to that bottled sunshine.  I wonder what colonists on another planet might think, after generations of trying to sequester carbon to make their atmosphere breathable, of the heedless way Earthers just burn the stuff up.

But this isn't meant to be a downer on fire.  Fire is awesome and powerful.  It allows us to live through the winters and make our food nourishing enough to sustain our massive brains.  It's like a little sun, because it releases the sunlight from past years.  And it echoes the way our own bodies burn carbohydrates for energy--fire breathes out carbon dioxide just like we do.  Can you picture a tiny little fire in each of your mitochondria in each of your cells?

In the summer, the earth breathes in.  It stores the sunlight in millions of plants, filling its atmosphere with oxygen.  In the winter, it breathes out--as our fires and our bodies both use up the stored energy, and release carbon dioxide.  We need both the breathing in and the breathing out to stay alive.  It's a beautiful, complex dance to think about.

Anyway, on to the soup.  This is my mother's Christmas Eve soup, which she got from her mother.  Trouble is, no one in the family agrees with me that Christmas Eve is for soup, so I thought I'd make it for Solstice instead.  As an extra benefit, it can be vegan, which was nice given Solstice was on a Friday.

Solstice Soup

1/2 yellow onion
4-6 carrots
4 stalks of celery
1 quart V8 juice
1 cup water
1/2 cup pearl barley
1 can white beans
1 can green beans
1/2 cup frozen chopped spinach
1/2 cup peas
1 tsp vegetable soup base*
1 tsp Old Bay
dash Worcestershire sauce**
salt, pepper, garlic powder to taste
dash Tabasco or cayenne if you like spice

Chop the onion and saute on medium high heat until it is starting to brown.  Add the liquid, chopped carrots and celery, and barley.  Cook for 30 minutes and then add all the other ingredients.  Feel free to sub in or out whatever vegetables you like and have.  Taste as you add the seasonings and don't stop till it tastes right.

*I used Better Than Bouillon, but a bouillon cube would also work.  Beef flavor is good if you don't have vegetable.
**This is technically not vegan because it has anchovies.  A dash of soy sauce or aminos might be good.

I served it with biscuits and there was only a little bit of whining.  At first Miriam whined because she "hates soup" (she does??) and then I told her it had green beans in it and she loved it, but then Marko whined because he does not like green beans.  Oh well.  It got et.

Wednesday, June 20, 2018

Enriched dough and the things it makes

The other day I got a compliment from a friend on my chocolate rolls.  Of course I was very chuffed.  (My feelings on baking have to be expressed in British-isms, because of British Baking Show.)  So I thought I'd share the recipe for the dough, plus a few of the different things I've made out of the same dough.

Chocolate couronne

Simple bread dough is just flour, water, salt, and yeast.  That makes a nice fluffy bread, but when you want sweet rolls, you add different ingredients to enrich the dough: butter, milk, eggs, and/or sugar.  That makes a very soft bread that doesn't form a hard crust on the outside, and pairs well with toppings like cinnamon or chocolate.  Here's my recipe:

Enriched Dough

1 cup milk
1/4 cup melted butter
1 egg
1/4 cup sugar
1 tsp salt
2 1/4 tsp (1 packet) yeast
3+ cups all-purpose white flour

Mix together everything but the flour.  I like to warm up the milk and melt the butter before adding them, but it's important not to get it so hot it kills the yeast.  Just warm is fine.  That'll speed up the rise a bit.

Add in three cups of flour and mix it well.  This probably won't be enough flour, so keep adding more as you mix -- probably with your hands at this point.  Once it's come together as a big lump of dough, turn it out on a floured counter and start to knead.  Keep sprinkling flour if it's still very sticky.  Knead about eight minutes or until it feels smooth and only a little bit sticky.

Enriched dough can rise a little slower than plain dough.  Cover it tightly and leave it in a warm place for at least an hour.  An hour and a half is better, unless it's already rising out of the bowl before then.  At this point you can refrigerate it, tightly covered, if you're not going to bake it today.  Otherwise, shape into whatever shape you want and leave for half an hour.  Preheat the oven to 350 and pop it in.  How long to bake it depends on the shape, but it should be golden brown on top and not squishy on the sides.  Rolls will be done within 20 minutes, but a loaf will be a good bit longer.

Cherry kolache

So what do I make out of it?  Donuts are a big hit -- just fry instead of baking.  Cinnamon rolls are good -- roll it out into a rectangle, spread butter and sugar inside, roll it up, and slice into individual rolls.  You can also do the same thing with other fillings, like jam or Nutella.  Couronne, babka, and kolache can be made with the same dough.

What I'm making today is a very easy kind of stuffed bread.  You just roll out the dough in a rectangle, spread filling in the middle, and fold in the sides.  You do need to cut some slashes in the top so that steam can escape.  I've used a variety of fillings from sliced apples to pie filling.  Today I'm doing cream cheese and cherry pie filling, because I'm a lily-gilder apparently.

Just roll it flat, add fillings...


...fold and slash some vents...


...let it rise, and bake for forty minutes or so.


Be sure to cool it down before you slice it, or the fillings will all spill out!


If you try my recipe, I'd love to hear what you make and how it works for you!

Sunday, May 14, 2017

Adventures in grilling

One of the lovely things about this house is that it has a nice big back deck to grill on.  So we got a charcoal grill and I've been having some adventures with it.  I love, love, love grilled food, and I'm not willing to wait till John feels like grilling.  (Who made the rule that women don't grill?  Given that it takes hours, it seems a job for the person who's here all the time.)

But I'll tell you, grilling is not as easy as it sounds.  The first time I tried it, it took me about an hour to get the fire going.  The venison backstrap I grilled was DELICIOUS, but it was quite a bit late for dinner.  Since then, I've learned a lot of secrets that grilling recipes often don't mention.  They say "build a medium-sized, indirect fire" and leave it at that!

So here's a few things I've figured out.

First, you have to build the fire some time before you need to start cooking.  I can't tell you how long, because I don't know how tough a time you will have.  This is one of the reasons why grilling is usually done at weekend picnics, when everyone has plenty of time and chips or something to nosh on while they wait -- it is impossible to say how long it's going to take, so mealtime could be anytime within a window of an hour or more. 

You can't just light charcoal with a match, oh no.  (Unless you shell out the extra for "match light" charcoal, which is a very good idea and probably worth it.)  Otherwise, you need some kind of kindling or firestarter.  Crushed-up paper doesn't work very well.  Lighter fluid is better, but you need to really soak the coals with it.  Best of all is probably starter cubes or sticks, which you put under your pyramid of coals.  And you have to open up the vents at the bottom of the grill, or all your efforts will be in vain.

After a while, the middle of the heap will be glowing red, and there will be some white ash on the outside of the coals.  It might not be in 15 minutes like it says on the package, but however long it takes, you have to wait till it reaches that point.  Otherwise you might find yourself taking all the meat off the grill again to get at the fire and mess with it when you find it's not getting hot.

Once the coals are hot, you can spread them out a bit.  If you want direct heat (for something you want to cook quickly) you can spread them out all over, but if you want a two-zone fire, you should stack them up on one side only so that the other side is cooler.  Then all you have to do is oil your rack, put it on, and throw on the meat!


A whole spatchcocked chicken is challenging, though, maybe start with brats?

My favorite thing to do with meat for grilling is some kind of dry rub.  I think cayenne goes really well with the smoky taste, but do whatever suits your fancy.  It's important that the meat is entirely defrosted -- unless you're doing those super thin burger patties, in which case keeping them frozen keeps them from falling through the grate before they're cooked.  While the meat is cooking, keep the lid on -- this keeps the food cooking on all sides instead of just charring on the bottom while the rest stays raw.  Your temperature control is the air holes, both top and bottom -- less air restrains the fire for a cooler temperature, more air will make it hotter.

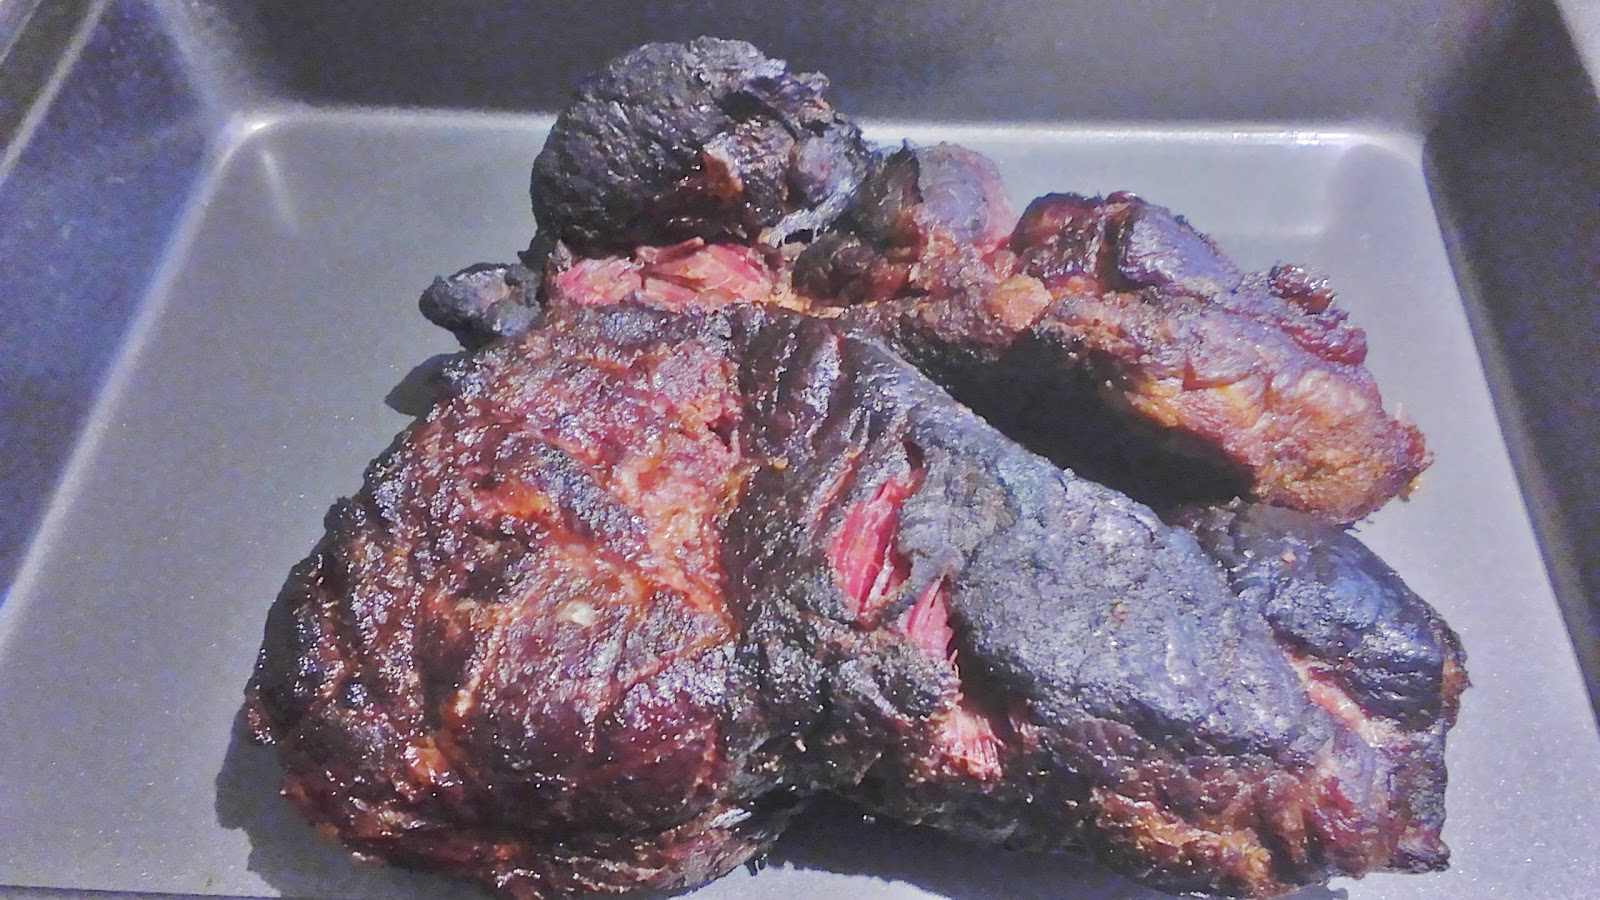
The one tool you absolutely cannot grill without is a meat thermometer.  Otherwise you may find yourself serving out meat that's cold and rubbery in the middle.  Or, like I did with this pork shoulder, drying it out because the recipe TOLD you four hours and it was done after three:


It was mostly still delicious, but a lot of the outside was charred.  Take that temperature!  Take it halfway through your expected cook time so you can see how fast it's cooking, take it a bit before you think it could possibly be finished, and keep taking it till you reach your target temperature.  Your recipe will tell you that: 165 for chicken, a bit less for beef if you don't like it well done, 195 for pork that shreds.

I'm also not certain you can grill without tongs.  In any event, when my kids wander off with them, I'll search however long it takes to find them before I grill.  You can move the coals around with them as well as grab the food off the grill without either burning yourself or dropping it in the ashes.

After you've taken the meat off the grill, it has to rest, if it's whole meat.  (Burgers and hot dogs will be fine either way.)  You can take the opportunity to grill some veggies, like corn on the cob or peppers on a skewer or whatever you like.  Eggplant and mushrooms are tasty grilled too.  After 15-30 minutes the meat will have cooled down enough that it retains its juices better when it's cut, so go ahead and serve it up!  The best part is getting compliments on the excellent seasoning when all you did was sprinkle it with salt.  The smoke does the rest.  I like to serve some sauce alongside, given that grilled meat can be a little dry on the outside, but it isn't obligatory.

Resist the urge to grill the entire meal, because grilled food is complemented by cool, fresh foods: green salad, three-bean salad with vinegar dressing, or maybe potato salad.  I promised ages ago I'd share my potato salad recipe, so here it is.  It's mutated a lot over time till it turned into a choose-your-own adventure.

Potato salad

Potatoes: boiled, completely cooled, peeled, and diced, in any order.  I like to boil them whole, cool them, rub the skins off, and dice them up, but if you'd rather peel them first, dice, and boil, that's fine too.  If you like your potatoes in firm, discrete chunks, you can add a tsp or two of vinegar to the boiling water.  I like mine to mash up a bit, so I don't.  Either way, boil them until just barely done, not falling apart.  Or you can even microwave them!  No one will know!

Dressing:
Good -- 50/50 mayo and sour cream, maybe with a dash of dijon mustard
Better -- ranch
Best -- homemade mayo

Here's how I make homemade mayo: I get a wide-mouth jar and put in an egg yolk, two tablespoons of lemon juice, a squirt of brown mustard, and some salt, pepper, and garlic powder.  Then I put the immersion blender in there and slowly drizzle in a cup of olive oil.  (Not extra-virgin, I hear that doesn't work -- regular olive oil.)  If you have a different kind of blender, or if you wonder if some other kind of oil would work, I refer you to the information superhighway, because I don't know.  I tried peanut oil once and the resulting mayo tasted like storebought, which in my mind is a total waste of effort.

Whatever you choose, don't add the dressing till the potatoes are completely cool.

Veggies -- add one or all:
Peas
Cucumber slices
Diced green peppers
Cooked asparagus tips

Add-ins -- any, all, or none, I'm not the food police:
Chives
Parsley
Dill
Chopped hard-boiled eggs
Dill pickles
Pickled beets (will turn the whole salad pink, BE WARNED)
Red onion, cut very small

I have experimented a lot with this potato salad and have never gone wrong yet. The only part that's difficult is making sure you start on time so the potatoes can cool down.  An hour ahead is fine, but you can also do it the morning of a party, or the night before.  It will still be delicious.

If you grill this summer, I wish you a quick-starting fire and meat that's crispy on the outside, fully cooked in the middle, and smoky throughout.  Good luck!

Saturday, January 31, 2015

Pumpkin cream sauce

I never seem to have time for a "real" post, so today you get a recipe.

My kids love mac 'n' cheese, but on the one hand cheese is expensive, and on the other, I'd like them to eat more vegetables sometimes.  So I came up with this sauce, which can go on pasta or chicken or perhaps some spaghetti sauce.  Whatever you like.

First, you melt some butter -- about 2 Tbs -- and completely mix in an equal amount of flour.  Then pour in about a cup of milk and bring to a simmer while stirring to make the cream sauce.  After it starts to thicken, put in half a can of pumpkin -- 1/2 to 1 cup.  Then season with garlic, salt, pepper, thyme, and sage .... just a little pinch of each.  If you want to really gild the lily, you can put some parmesan in.  And then pour it all over your noodles.

It's ridiculously good.  Even the kids think so, and they think they don't like pumpkin.

Friday, April 4, 2014

7 quick meatless meals

Because I've decided to make non-take takes a Thing.

Fridays can be an issue for us.  I like to serve plain pan-cooked whiting because it is cheap and easy, but no one actually likes it except Michael.  The grownups eat it because it's not bad, and Marko gets bribed to eat a certain number of bites and then fills up on mashed potatoes.  So I'm really trying to move away from that.

However, without gluten to fall back on, we have to be creative.  Here are a few we like.  Warning: I don't do fancy.  None of these are Impressive.  All of them can be done in half an hour or less, though, so that's a perk.

1

Oyster Chowder

Aldi sells canned oysters quite cheap, but this would work fine with clams too.

Saute half an onion, or so, in butter.  Add flour and make roux out of the remaining butter.  (I've been using corn flour, which makes a roux just like wheat flour does -- but you can omit this step if you don't have a flour you can use.  You'll probably want less liquid.) 

Then chop up 3-4 potatoes and put those in.  I peel them for this soup, because I think the peels make it look dingy.  Also 1-2 carrots if you have them.  Add water, milk, and/or liquid from the can of oysters -- I usually do some of each, enough to barely cover the vegetables.  Simmer until everything is soft.  Add in the oysters and get them warm, and perhaps some frozen corn if you have and like it.  Throw in some chopped garlic or garlic powder.

Then you have a choice.  If you like it chunky and brothy, you can leave it the way it is.  Or you can mash with a potato masher to make it more chowdery, or take a wand blender to get it really smooth.  I go the potato masher route usually -- it breaks it up without making it homogeneous.

Then you season however you like.  I do salt, pepper, marjoram, thyme, and rosemary.  It's good garnished with sour cream.  This amount always gives us a little leftovers after feeding the four of us, but I don't care for the leftovers of it, so keep that in mind when scaling the recipe.

2

Mussels

Mussels are the cheapest kind of shellfish, almost every time.  Aldi sells them frozen for quite a decent price.  You can just put them, fresh or frozen, in a pan with a little water and steam them till their shells open.  They're good with tomato sauce or garlic butter, served over rice or pasta.  The kids like pulling them out of the shells.  I have been intimidated by shellfish my whole life, but I actually like mussels.  Lobster is still a big No, but this rarely comes up in my life.

3

Tuna Noodle

This is what we call it.  I serve it for Friday lunches or when John's not there, but it can be made gluten-free with gf pasta and an alternate flour.

This is just mac 'n' cheese with tuna in it, but I'll tell you how I make it.

Cook the pasta.  While it's cooking you make the sauce.  Start with 3 T of butter and about 2 T of flour.  (Again, corn flour works well.)  Once it's all melted and mixed together, you pour in about a cup of milk.  Add the spices: garlic, salt, pepper, and mustard powder.  Don't skip the mustard powder -- a couple of good shakes.  Sometimes I like curry powder or chili powder in there too.

Bring the white sauce to a simmer while you grate the cheese.  I do cheddar, the sharper the better, about a quarter of a pound.  More is better, but this is true of cheese in almost every instance.  Throw it in as the white sauce starts to bubble, and stir it really well to make sure there are no floury lumps in there.  I also throw in 1/4 cup or so of pumpkin puree if I have it.  It makes the sauce nice and orange, and the kids never notice it.  Once the cheese is melted and the sauce is smooth, I add two cans of tuna and a handful of frozen peas.  Then mix in the noodles and serve.  Some people like bread crumbs or more grated cheese on top.

For a totally different recipe, you can omit the cheese and tuna and increase the pumpkin to a cup or more.  Then season with sage and thyme instead of mustard powder.  I was surprised with how the kids wolfed it down.

4

Mock lasagna

Lasagna is a lot of work, right?  All those layers, and you end up chewing and swallowing it all.  So I like to make it all mixed together: tomato sauce, spinach, ricotta, and herbs for the sauce, then serve it over noodles, rice, eggplant, and/or mushrooms.  Each bowl gets a grating of mozzarella.  We love this.

5

Fried fish

Take a fish fillet of some kind you like -- cod, whiting, flounder, tilapia, whatever.  Make sure it's defrosted and heat maybe 1/8 inch of good oil in your pan.  You can saute okay in butter or olive oil, but for high heat it's better to use something with a higher smoke point, like peanut or coconut oil.  The USCCB says frying in meat fat is okay for Fridays, did you know that?  (They say stock is fine too.)  So I use what I have.

Dip each fillet in beaten egg and then roll it in cornmeal.  It's good to season the cornmeal with salt, pepper, paprika, even cayenne if that's how you roll.  Once the oil is good and hot, throw your fish in.  When the first side is brown, flip it over and do the other side.  It turns out tasty and crunchy.  Serve with oven fries and coleslaw, maybe?  You can easily make a decent tartar sauce, if you like it, by mixing mayo and sweet relish.  I can make both of those from scratch, but since I don't usually have both on hand, I just serve with ketchup.  Malt vinegar is traditional too.

6

Enchiladas

Make enchilada sauce.  That's pretty much tomato sauce, tomato paste, chili powder, onions, garlic, all to taste.  A veggie puree would probably go totally unnoticed here.

Layer the sauce with corn tortillas and shredded cheddar cheese in a casserole dish, making sure no corn tortillas stick out over the sauce.  Cover the whole thing in cheddar cheese and bake for 20 minutes or so.

7

Salmon casserole

Brown some rice in butter in a pan, like you were going to make risotto.  When it starts to smell toasted, add the right amount of liquid (twice as much as the rice).  You can use water or milk, or vegetable stock if you happen to have it.  Let it simmer till the rice is cooked and the water is absorbed.  Then add a bit more liquid and stir while you start throwing more ingredients in: a can of salmon, with the bones removed or mashed up with a fork if it has them; sauteed onion; frozen vegetables of some kind (broccoli is good for this); garlic.  Stir until the rice is really soft and gooey and the liquid is absorbed again.  At this point you can mix in some sour cream if you have it to make it even creamier.  Then throw in some cheddar cheese and stir it in till it melts, and serve.

More quick takes at Conversion Diary.

Saturday, July 7, 2012

A few summer treats

Is it just me, or does everyone suddenly have more zucchini than they know what to do with?

I got two big zucchini from a friend a little bit ago, so I've been testing different recipes with it.  I don't actually like zucchini, as a general rule, so it's been fun trying to see how I do like to eat it.

First was zucchini falafel.  You just take shredded zucchini (shredded on a box grater or in the food processor) and sub it in for chickpeas in falafel.  I added salt, garlic powder, and cumin, plus enough flour to make it a doughlike consistency.  (For a mid-size zucchini, maybe 1/4 cup.)  Then I cooked it in my hot cast-iron pan in a bit of olive oil.  It wasn't as delicious as real falafel -- more chewy, less crunchy -- but it was quite good.  Especially considering it's zucchini!

Then this morning, I adjusted my applesauce cookie recipe to make zucchini cookies.

Zucchini Cookies

1 cup shredded zucchini
1/2 cup sugar
1 egg
1/2 cup oil or melted butter
1/2 tsp vanilla
2 cups flour (whole wheat or white)
1 tsp baking soda
1 tsp cinnamon
1/2 tsp salt
(1/2 cup chopped nuts)
(1/2 cup raisins)

First mix the wet ingredients together, then the dry, then mix together.  Cook in a 375 degree oven for 10-15 minutes.  To make applesauce cookies instead, use 1 cup applesauce in place of the zucchini AND the sugar.  I think applesauce is sweet enough as-is.

Another new development is my first cucumbers.  I am so excited because I love cucumbers.  I wasn't quite sure when to harvest them, because they kept getting bigger and less green, but they still had little spines on them.  Eventually I just picked them, spines and all, and peeled them.  My first bite of the first cucumber made me think, "Uh-oh, it must be overmature," because it was bitter.  But once I got past the stem end of the cucumber, it was the sweetest cucumber I'd ever tasted.  The variety is called Delicatesse.  I'd better save seed from them -- they're a keeper.  Took no particular effort to grow, either.

With that first cucumber I made a cucumber-mint smoothie.  It reminded me a bit of a Starbucks green tea frappecino ... which happens to be my favorite drink ever.  I grated the cucumber and stuck it in the freezer a couple hours to get half-frozen.  Then I blended it with several mint leaves and about 1/4 cup of plain yogurt, with a little squirt of honey to sweeten it.  Now I'm thinking I want to make another one, but with green tea added.  Doesn't that just sound delicious and summery?

Now if only my tomatoes will get ripe ... I have dozens of green ones and check them every day, hoping I can stop eating grocery-store softballs and actually eat a REAL tomato again!

Tuesday, February 21, 2012

Is this nesting?


I didn't really "nest" last pregnancy. I made a couple of extra meatloaves, chucked them in the freezer, and called it good. I was too exhausted from work to do much else.

This time, I don't really see why I'm not more tired. Marko doesn't sleep through the night more than half the time, and when he does, I still don't. It's common for me to wake up every hour or two, and then get pulled out of bed at 5 a.m. to rock him in the (vain) hope that he will go to sleep again. I rarely get eight hours, and it's never in one go. Ever.

And yet, once I'm well up and have had some breakfast, I start feeling this crazy zing. Half energy, half anxiety. I have a long before-baby to-do list, but I don't often get to cross things off on it. (Though sometimes I spend a lot of time staring at the list, trying to think what I can add and then do so I can cross something off.) Most of the items are either shopping (which I can't do on the average weekday, not having a car) or it's way too soon to do them (like making laborade). I know I've got 11 more weeks, but it feels like time is just ticking away on me -- seriously, this pregnancy has flown by -- and I'm going to turn around and find I'm in labor and haven't done a thing on my list.

Meanwhile, I have the same anxious feeling about my garden. I know I'm going to be tired and uncomfortable as the due date gets close. But the due date is almost exactly the last-frost date. There's so much I am going to want to plant right then! I want to work ahead on the garden and get it all done now ... but it's February. So I can't.

What do I do with all this nervous energy? Laundry? Ha, no. I do random things that my brain fixates on and declares, "This is a good idea." Usually it isn't particularly.

For instance: last October we had a really big snowstorm and our whole yard was covered in fallen branches. After a month or two a friend came with his chainsaw and got the big stuff, but the smaller stuff was still everywhere. But no one had the inclination to do anything about it until suddenly a week or so ago I looked at that back yard and said, "It looks so awful! How is the grass ever going to grow through this? What about the tulips? What about having a place to play?" So I decided that every day I'd pick up a little bit of it, being careful not to do too much on any one day, so that I wouldn't strain my back.

About two hours after I'd made this decision, I'd cleaned up the whole yard and made three massive brush piles. On subsequent days, I raked up all the loose twigs and leaves in the yard, dragged the leaf piles into the front yard, piled them on my garden beds, made brick edgings for the beds, etc. I just ... can't ... help myself.

With the yard all clean, my eyes lighted on our shed. Our hideous shed. I've wanted to paint it for a long time. So I poked around in the cellar to find some leftover exterior paint. My only choices were the original color (turns out that's "celery green") and white. So I chose white. (What I really wanted was to paint it barn red, with white trim. Unfortunately that paint was not to be found, and since painting the shed is, like, 20th on our home improvement priority list, I couldn't exactly justify buying the paint.\


It actually doesn't look so horrible in this picture. But everything looks worse now that it's winter.

I wasn't 100% sure how the paint would look, so I decided to just do the trim, which was already white so it wouldn't even show. Ha. It showed. It looked terrible, nasty rusty celery green with BRIGHT white trim. So what can you do? I painted the rest of it, too. Now the whole shed seems to glow. Luckily I already have a plan to grow morning glories all over it ... hopefully that helps.

The worst part was wondering how I was going to explain to my husband that I kind of sort of accidentally painted the shed. I couldn't help it, your honor! I was pregnant at the time, which means it sounded like a really good idea that totally couldn't wait till the next day to get my husband's opinion on! However, I'm pretty sure he's seen it and hasn't noticed. (If you're reading this: sorry it looks kinda awful. I could paint it again!)

The other place my nesting instincts have kicked in is in the kitchen. I just have to bake, pretty much every day. Sourdough boule! Baguettes! Pancakes! Blintzes! My cravings tag-team with my nervous energy and force me to reach great heights in the kitchen. For instance, I wanted a Reuben. Which meant making sourdough bread (this recipe -- takes a night and a day, be warned), sending my husband to buy roast beef and mustard, and digging up the can of sauerkraut that's been sitting in the cupboard for six months and was my inspiration for the whole thing.


A different day, I wanted lasagna. I had pretty much none of the ingredients required for lasagna. But why should that stop me? I made homemade ricotta (actually quite easy) and homemade egg noodles (actually really hard) and made something like sausage from ground venison. There was nothing in there that wasn't made from scratch, unless you count tomato sauce because I didn't smoosh the actual tomatoes for it. Or, well, I guess you can't count the mozzarella either because I don't know how to make that. Still, I was pretty darn proud of my lasagna -- and it was delicious.

Once I had made the sourdough bread for the first time, I just couldn't be satisfied with Reuben sandwiches. What I wanted was something I used to have as a kid: when we would go visit my grandparents, my grandma would always serve homemade sourdough bread. Everyone would have it with apricot jam, except my grandpa. He would have it with sour cream and marmalade. So of course I picked up on that and ate it that way too. (I would do anything to be like Grampy, up to and including turning down apricot jam.) So now when I eat sourdough bread, I start craving marmalade.

Again, no marmalade around the house. Starting to feel guilty importuning my husband to stop on the way home and spend our precious grocery budget on random things I suddenly crave. But we did have oranges! So I made homemade, lacto-fermented marmalade. (This recipe produces something that's more like orange slices swimming in liquid, which doesn't go well on toast. So I ran it through the food processor, and now it's more marmalade-y.) We did have sour cream, but why do anything the easy way? I strained my homemade yogurt and used that, for a 100% homemade, 100% fermented result.

Delicious.

I admit this is not the best use of my time. I may look like the mom who's "doing it all," but on my baking or yard work days, the house starts to look pretty darn bedraggled. Marko enjoys my projects, mostly (keeping him from touching the wet paint was kind of a chore), so I don't feel I'm neglecting him, but it is rather sad to come out of the kitchen with my delicious bread and marmalade and see books and toys scattered everywhere. Plus the kitchen itself looks like a bomb went off. Sooooo perhaps I could find a way to apply this energy to cleaning the house?

Here's hoping. Meanwhile, I only have 11 weeks to buy a carseat and order more cloth diapers and make some food for the freezer and set up the crib and figure out what Marko's going to sleep on and order the birth kit and collect homebirth supplies and and and and .....! Wish me luck.

Friday, February 3, 2012

My sourdough rose this time!


Remember how, ages ago, I made a sourdough starter? It did okay. Never got all that bubbly, but it was sour-smelling enough. I made garlic knots with it, and they were a bit too sour and not risen enough, but not terrible. Pretty soon, though, the starter got mold on it and I threw it away.

I had given up on the whole idea of sourdough until two weeks ago, when I saw on Modern Alternative Mama that Kate had trouble with her starter as well. She had been told -- like I had -- that it's okay to pour off the "hooch," the funky liquid that rises to the surface. Apparently the hooch helps keep the mold off your starter. She recommends stirring the hooch back in every time you feed it, at least until your starter is well-established.

Another tip which I recently read, and also established experimentally, is that you really do have to get rid of some of your starter when you feed it. I had been told that you don't have to get rid of any starter, just don't feed it quite so heavily. That actually doesn't work as well. A good proportion is one part original starter, one part flour, one part water, each time you feed it -- though I don't stick to that. I try to keep the starter to about a cup, and feed a quarter cup of flour and a quarter cup of water each time. I don't throw the old away, but I use it to make sourdough pancakes or something else that doesn't require much of a rise. The more you use your starter, removing some and refreshing it, the quicker it will come to life.

The reason, as far as I can see, for this is that the starter needs to breathe. If you've got a quart jar full of starter, only the top layer is really active. Much better to keep a smaller starter so it can get plenty of air.

A few other handy things I've picked up on: I don't feed quite equal parts flour and water. I tend to use a little less water. The reason for this is that a thicker starter shows more bubble action down inside the jar -- probably just because it holds the bubbles better. I'm not sure this means it's a stronger starter, but it can't hurt.

Another is that warmth will make a huge difference to your starter. I can't afford to be running a hot pad or low oven all the time, so most of the time the starter has to muddle through in 68 degrees like the rest of us. But when I feed it, I often give it a quick burst of time in a warm oven -- I preheat the oven for a minute, turn it off, and put the starter in there for a bit. Gives it a head start. The same goes for giving the bread dough, when you make any, a chance to rise. A nice warm place will do it good. I remember my mom having good luck putting dough to rise on top of the dryer while it was running!

A final tip: it shouldn't smell overpoweringly sour. I notice in my post from almost two years ago that John kept complaining about the smell of the starter whenever he was in the kitchen. That is way too sour. My current starter only smells if you stick your nose right in the jar, and then it smells kind of like beer.

So far, I've made sourdough pancakes a few times, and loved them. They're even easier than regular pancakes, and they taste fabulous (and not sour at all). The texture's a little different -- almost like injera, because it's so bubbly. I found it helpful to mix the baking soda with water before mixing it in, so it wouldn't clump up in the batter. We had the pancakes with jam, but they'd be even better with berries or bananas.

[ETA: I also made this sourdough carrot cake, which was fabulous. Who would have known you could make cake out of sourdough? I had seen recipes, but figured it must not turn out very cakey .... I was wrong. It was very light and just the right amount of sweet. This would be great with cream cheese frosting, too.]

And then I screwed my courage to the sticking-place yesterday and tried to make focaccia. I planned lots of extra time because I was sure I'd need it, and planned to count any decent rise as "doubling." I remembered that my garlic knots never doubled. But after just the recommended rise time (in a warm oven) it actually did double! The bread turned out excellent. Its only flaw, in my opinion, was in being a bit too tall. Isn't focaccia supposed to be an inch or so thick, not two and a half? I just had too much dough for the size pan I had -- and that's even after taking a handful of it out and making garlic knots out of it. Next time I think I'll make two pans of it instead of just one. I guess I wasn't expecting quite the meteoric rise that I got! I had been convinced by my past experience that sourdough doesn't rise much. This one rose just as much as a regular yeast bread would. And it wasn't particularly sour, either -- just a faint tang, not so you'd notice without looking for it.

I don't know how long I'll be able to keep up with my starter before letting it go dormant in my fridge and half forgetting about it. But meanwhile, I'm really enjoying baking with it ... and eating the bread.

Saturday, January 21, 2012

Cooking with cast iron

One of my Christmas presents this year was a set of three cast iron skillets of different sizes. I've been wanting to try cooking with cast iron for awhile, so I was particularly excited to get Christmas dinner started on one of those.

Mine came preseasoned, thank goodness. You see, I'm pretty intimidated by cast iron. There are so many instructions! So many things you're supposed to do! So many things you're not supposed to do!

For instance, you're supposed to preheat them slowly, starting on low heat before moving up to the temperature you want. Because they're heavy, they take longer to preheat than my old teflon pan does. You're also supposed to heat them on a burner before putting them away, to make sure they're completely dry. If you have a glass-top stove, which I do, you can't scootch them across the stove - you have to lift them and set them down carefully.

You can't use any metal implements on them. You can't pour cold water on them when they're hot. You can't soak 'em. You can't scour 'em. You can't use soap on 'em. In fact, pretty much everything that actually works to get gunk off, you can't use.

After a few battles to get off gravy with nothing but lukewarm water and a soft rag, I made a new rule: they are only for dry things. Sauces are just too dang much trouble and I can do them in a pot.

What does work well in my cast iron? Steak. Pancakes. Corn pone and cornbread. Crepes. And no greasing is required. As someone who used to have to add more butter before each pancake to keep them from sticking, I do appreciate that. Though I don't like to test fate, either, so I oil them lightly before most uses.

My major fail, though, was eggs. John made me fried eggs in the big skillet that turned out perfectly. So I got daring and tried scrambled the next week. And you know how every time you try to scramble an egg, you look away for one second and when you look back, the eggs are cooked to the pan? Yeah. That happened.

So I tried all of the approved methods. Immediate cold water is called for with cooked-on eggs, but that's not allowed with cast-iron. So I let it cool down on its own and then tried to wash it with a soft rag and no soap. No luck. Another tip was to scour with salt. That got some off, but left a lot. I had heard to boil water in the pan to loosen cooked-on food, but that of course made it worse. I scraped a lot off with my fingernails. And then I said "What the heck" and soaked it for awhile.

When I came back, there was a bit of rust forming. What?! So I dumped the water out, scoured the egg, seasoning, AND rust off the pan and set to reseason it. I rubbed it with oil (olive, because that's what I had) and put it in the oven for an hour at 350. It made the whole house smell, like melting plastic, but it seemed to have worked. Until I touched it later and found it was now sticky. Apparently I had used too much oil. So I heated up the pan and wiped it down with a paper towel. Now it's only a little bit sticky. Sigh.

I'll admit it: those pans are high-maintanence. They're fussy. But I don't think I care to go back to making cornbread any other way. The brown crust it forms is just too good. Crepes that don't stick are another plus, one I've never achieved with another pan. And it is nice to be able to cook a steak just right without it sticking or being drowned in oil. I like the way they can go from the stovetop to the oven, and the way they keep the food warm while you're setting the table.

So, they're worth the trouble. But for eggs and anything sticky or saucy, I'm keeping my old pan. There may be a way my cast-iron could handle those, but I think I would get grey hair trying to find out the secret.

Do you use cast iron? How do you like it?

Tuesday, December 6, 2011

Creamy turkey soup

I love creamy soups so much that there was no way I wasn't going to try to make one out of my leftover turkey. Especially after seeing so many glorious, drool-inspiring pictures of them scattered around the internet immediately after Thanksgiving.

Mine was inspired by a wild rice soup, but wild rice cost an arm and a leg when I saw it on the store, so I just went with brown. I would recommend brown over white, because it gives more depth to the soup, but I don't think that makes or breaks the soup either.

I think what makes or breaks it is the mushrooms. I wouldn't leave those out. And I think it would be missing something with canned mushrooms, too. Fresh mushrooms absorb butter when you saute them, which is the main goal here.

Creamy Turkey Soup

3 Tbs. butter
5 fresh mushrooms, chopped
3 stalks celery, chopped
2 carrots, chopped
2 Tbs. cornstarch*
1 cup cooked brown rice**
1 quart turkey stock
1/2 cup diced leftover turkey
salt, pepper, garlic and rosemary to taste

*Or flour, or another starch. Just keep in mind that flour only has half the thickening power of cornstarch. You can adjust the thickness of the soup at the end by adding more starch to milk and mixing it in.

**I cooked the rice first because it does take a long time to cook. You could cook it in the soup if you don't mind simmering longer, or if you're using a different kind of rice. But you'd need to increase the liquid accordingly.

Saute the mushrooms, celery, and carrots in the butter. When they are aromatic and beginning to soften, and the mushrooms have soaked up all the butter you think they're going to, add in the cornstarch and cook a little longer. Then pour in the stock and cook until the vegetables are just as soft as you like and the broth is thickening nicely. Add the rice, the turkey, and the spices. Remove from heat and garnish with yogurt, sour cream, regular cream ... whatever you like in your cream soups.

This soup was so ridiculously good that I don't feel like making anything else with my almost two gallons of turkey stock and several containers of leftover turkey. I just want this soup every night for the next two weeks. I wonder if John would mind?

Sunday, November 20, 2011

Primal meatballs

I've been in the market lately for good gluten-free snacks. But since I'm not much into replacement foods -- gluten-free breads and gluten-free noodles are expensive and not really the same anyway -- it means I've been coming up with all new recipes.

Tonight I made meatballs, my second attempt at doing them without breadcrumbs, and they turned out great. The carrot stands in for the breadcrumbs, to lighten up the meatballs and stretch the meat out a bit. (Plus I don't believe that tomato sauce counts as a vegetable.) At the amount I've put in, you can't taste it, though you could add more.


Primal meatballs

1/2 onion, grated or very finely diced
1 clove garlic, grated
1 carrot, grated
(all three could just go in a food processor if you weren't too lazy to get it out ... plus it will give you the very fine texture you need so your meatballs aren't lumpy)
1 lb. ground beef

Mash everything together with your hands. Roll the meatballs together firmly, so they don't come apart -- any size is fine. Brown in a skillet, rolling them around to get all the sides. Then drop into your sauce, simmer for awhile, and serve.

Spaghetti sauce goes well, and Marko didn't miss the noodles. Or for Swedish meatballs, simmer meatballs 1/4-1/2 cup of beef broth, and add 1/4 cup sour cream when ready to serve.

*

Another "recipe" that I love to do is meat roll-ups. Simply spread a piece of deli meat with cream cheese and wrap around a piece of steamed asparagus. Delicious -- and the kiddo can run around the house with it. Win!

The one danger of gluten-free cooking is running out of food. I meant to go to the store yesterday, and the trip had to get put off till today. Marko and I were living off of applesauce and frozen berries! No dipping into the pantry for pasta and tomato sauce; almost all we've been eating is fresh stuff -- which is great, but requires some advance menu planning.

Monday, August 8, 2011

Tons of tomatoes

When I started growing tomatoes, I hoped to save a little money. I knew what I spent on tomatoes: $2.69 every two weeks for a plastic clamshell of six Romas at Aldi. So I should save about $5 a month for 1-2 months while we were harvesting. Perhaps a couple of bucks more for a few jars of salsa or pasta sauce. Since the plants themselves cost about that much, it wasn't going to be a big saving. But it was also a learning experience, of course.

This is how many tomatoes have been ripening on our table for the past several weeks. As we eat some, we pick more. It turns out to be more than three per week.

I had forgotten my Rule Number One of Food Buying: Whenever you don't eat one thing, you're going to be eating something else. This rule gets invoked all the time when I cut something out of my grocery budget -- say, ice cream, pretzels, or white bread -- and find that I don't have enough to eat that week because I forgot to replace those calories with something else. It turns out the inverse is also true: when you're constantly eating tomatoes, you may find you eat fewer bananas, peanut butter sandwiches, and lettuce. With such an easy (and free) food to snack on all the time, you end up eating them all the time and saving money elsewhere.

Use #1 for tomatoes is as a baby snack. Usually an outdoor snack, because he tends to spit out whatever part he doesn't like (mostly peels).

Use #2 is caprese salad: tomatoes, basil, mozzarella, oil, vinegar. Can't beat that.

Use #3 is sandwiches. Today's was tomato, cucumber, mozzarella, basil, and a teeny bit of onion on bread spread very lightly with mayo. (Pesto is better, but I had none made.)

Use #4 is in this pasta dish:

Cold cooked pasta, mozzarella cheese, tomatoes, cucumbers, olive oil, torn-up basil. So yummy and summery.

Use #6 is salsa and spaghetti sauce. I haven't really had any success with spaghetti sauce -- it tastes fine, but just isn't the texture I'm used to -- but the salsa is excellent.


Marko approves. I have no idea how much money we are actually saving, but it's more than $5. My garden has officially paid for itself! Plus, we're eating a good bit healthier thanks to the displacement of other snacks.

Later I'll show you how the plants look now (which is kind of dreadful), but keep in mind, I've gotten at least 50 tomatoes off these plants. My only costs were four seedlings and one seed packet. Some tomato cages I found in the shed supplemented. I did not amend the soil at all beyond breaking it up. In fact, I spent very little effort on these little guys at all -- and they still rewarded me! Next year I'll do more, having learned more, but for now, it's nice to know that you can do everything "wrong" and still get some tomatoes.

Tuesday, August 2, 2011

Cool cucumber recipes

Yesterday I received a windfall of cucumbers, if one could call it that: a friend was drowning in the excesses produced by her plants and gave me a big bagful. Normally I just chop the cucumbers, add some chopped tomatoes and basil, and dress the salad with oil and vinegar, but I can't have that every day of the week. Even if I did (and I might after all -- it's so delicious), I wouldn't finish up all these cukes!

John puts them in baloney sandwiches, which is good. And I've tried them in my BLT's -- definitely a nice touch. (I also use pesto instead of mayo -- seriously, try it.) But even that is not enough. I am wallowing in cucumber riches, and I want to mix it up a bit.

So I'm turning to a few other favorites. The first one is from my mom, who told me it was a favorite dish in Iran. It's terribly simple.

Peel and chop cucumbers into chunks. Mix with plain yogurt -- thick Greek yogurt is best, but any is fine. Add salt and dill to taste.

I don't know what you call it, but it's definitely a staple all around the Mediterranean.

The other one is a recipe I pulled out of The Joy of Cooking when, as a pre-teen, I hosted a Valentine's Day tea party. What's a traditional tea party without cucumber sandwiches?

Peel cucumbers and grate them. Put in a strainer, in a cheesecloth bag, or between paper towels and squeeze as much water out as you easily can. Move the grated cucumber to a bowl and add cream cheese until it's a thick, but spreadable consistency. Add grated onion -- say 1/4 onion for each cucumber. Season with a teeny dash of red pepper sauce (like Tabasco), salt, and white (or black) pepper. Spread on white bread and cut into triangles (or, as I did, hearts).

The Joy of Cooking has several cooked cucumber recipes, but I never tried them. What's the point of cooking something that is so fresh, delicious, and summery raw? I am going to rustle up a recipe for chilled cucumber soup, though. That sounds perfect.

Saturday, July 23, 2011

Zucchini bread with less sugar

I don't, as a rule, like zucchini. That's why I have no plans at all to grow any. Besides, if I should want some, everyone always has too much of it! I don't know when is the last time I went through a summer without someone offering me free zucchini.

Last week I got to go help make jam at a friend's mom's house (which was the BEST! they have this big vegetable garden and were extracting honey that day!) and left with two jars of jam, a cucumber, and a zucchini the size of a baseball bat. They were going to throw it away! So I rescued it, with the knowledge there will always be at least one thing you can do with zucchini -- make zucchini bread. I love zucchini bread.

So I got home and hunted for a recipe, only to discover that pretty much all of them had two or even three cups of sugar! That is way too much, in my opinion. It tastes fine, but I had the feeling it would taste equally fine with less, plus I'd feel much better about sharing with the baby -- and eating it myself -- with less sugar. So I went out on a limb, surveyed the recipes, decided on my changes, and went for it. It was delicious.

Less-Sugar Zucchini Bread

Preheat oven to 350 degrees. In a large bowl combine:

1/2 cup melted butter (you can add a whole cup, but butter is expensive and it was fine with 1/2 cup)
3/4 cup sugar
1 tablespoon blackstrap molasses (or use brown sugar instead of white sugar)
2 cups grated zucchini (easy in a food processor, but possible by hand too)
1 egg

Mix the wet ingredients. In a separate bowl (or on top of the wet, in the same bowl, if you're like me) mix the dry:

3 cups flour (white, wheat, or a combination)
1 tablespoon cinnamon
dash nutmeg
dash ginger
1 teaspoon baking soda
1/2 teaspoon baking powder
1 teaspoon salt

Fold in any add-ins (optional):

1/2 cup chopped walnuts, pecans, etc.
1 cup raisins, dried cranberries, or chocolate chips

Pour into two greased and floured loaf pans, or muffin tins for 24 muffins.* Bread is done in about an hour; muffins will be done in 20 to 25 minutes... or whenever a knife comes out clean. Allow to cool a bit before cutting.

*I fit mine into one pan, but I think my loaf pan is extra-large or something. Also I left out the option add-ins. A good option is to fill your loaf pan 3/4 full of batter and then distribute the rest into some muffin cups.

It turned out well enough that I have a second batch in the oven now, after only two days! I didn't miss the extra sweetness at all.

Tuesday, July 19, 2011

The taste of real food

I have a confession to make. Sometimes I like fake food better.

You know what I mean. All that pre-made stuff, canned soup, frozen lasagna, boxed mac 'n' cheese. There are a couple reasons for it. First, I don't have to cook it, and any mother can tell you food tastes so much better when you're not the one who made it. Second, processed food always has a mix of seasonings I can't replicate. All the box will say is "spices" and what they probably mean is "MSG and a bunch of other stuff you don't have in your kitchen." And, well ... I like that taste.

Real food is good, sometimes delicious, but sometimes I get tired of the taste. We don't season all that much over here, and my spice cabinet does leave a bit to be desired. And even if I season food perfectly, it doesn't have that extra-savory kick that cheap processed food has. I find myself sighing over food -- "This is good, but it is not as good as Taco Bell."

My defense of real food was always, "You don't need a ton of extra flavorings if your ingredients are high-quality." Unfortunately, shopping at Aldi doesn't really put you in the way of high quality. The vegetables, especially, are pretty tasteless after their trip across the country. The meat just tastes like meat anywhere, mild and inoffensive. If you want great taste shopping at Aldi, you have to get those pasta sauce envelopes or frozen chicken wings... which won't make you feel good.

Now a few things have changed. In my garden, I have fresh (delicious) tomatoes, basil, cilantro, and thyme. We also recently bought an order of grassfed beef. Good ingredients are finally within our reach!

And it's been a revelation. I was feeling peckish the other afternoon, so I threw some things together. Leftover taco meat, homemade refried beans, cheese, tortilla, and homemade pico de gallo.* I took a bite.

And it was like OH MY GOSH, I didn't know I could make stuff that tastes this good! It was better than Taco Bell. It was better than Chipotle. It was better than my personal taco mecca, Taco Del Mar. (If you are on the West Coast, have a Mondo Burrito for me.) It was so fresh and flavorful and REAL.

The same happened when I made spaghetti the other night. Instead of canned sauce I used my own tomatoes, and I chopped up a little fresh basil. So much better than my usual spaghetti!

So, now that I know the secret, all I have to do is extend it to the rest of the food I eat. That should be easy enough next year, when the rest of my garden is in. And we're definitely staying with grassfed meat; there's pretty much no downside. It's more ethical, more local, more delicious, more healthy, more variety of cuts -- and the price is a little less than Aldi ground beef, if you buy in bulk. And there's something about meaty-tasting meat, rich tomato-y tomatoes, fresh cilantro, fresh basil ... that simply can't be replaced by a dash of MSG.

*Recipe for pico de gallo: chopped tomatoes, chopped fresh cilantro, and a little bit of chopped bell pepper, with salt. It's supposed to have jalapeno, onion, and lime juice, but I was keeping it simple. I later lacto-fermented it, which turned out to be a mistake. Even though I followed all the directions, it turned effervescent and alcoholic. How come that didn't happen to my lacto-fermented lemonade? That would have been good. But tomato-cilantro wine is not. My guess is that my tomatoes are just too sweet for that kind of treatment, but I'm not sure. It might be just a stray yeast spore that wandered in. What a waste of good tomatoes. So last night's salsa batch (tomatoes, onion, jalapeno, cilantro, salt, run through the food processor) is not getting lacto-fermented. It's too delicious to risk ruining.

Thursday, July 14, 2011

Creamed plantain

I've never had the fruit called plantain. The plantain I have had is called broadleaf plantain, and it grows all over my yard. Since it grows easily in compacted soil, it's been wonderful for helping heal all the bare patches in my yard. Technically it's a weed, but I like having it mixed in with the grass.

It has tons of medicinal uses. Its seeds, called psyllium, are the main ingredient in Metamucil. It's supposed to be good for colds, bug bites, poison ivy, and even obesity and tumors! I didn't care particularly about that ... I just didn't want to open a can of spinach.

So I went out to pick some plantain. It's best to pick the tiny, young leaves in the center of the plant rather than the tough outer ones. (The outer ones serve as a good outdoor paper towel -- useful for smashing gross bugs or picking up stuff you don't want to touch. But they're too tough to eat.) It takes a lot for a serving -- a cup, loosely packed, is about right.

Then I rinsed the leaves in a bowl of water, pulling them up out of the water so the dirt settled down to the bottom. I chopped them up small, added some clean water, and put them on the stove to boil for about ten minutes ... plantains are tough so they need a lot of cooking.

Once they had changed color and looked done (by which time the house had taken on an odd smell, kind of like browned butter), I drained them and left them in my bowl while I made a white sauce: 1 tablespoon butter, 1 tablespoon flour, and half a cup of milk. When the sauce reached a simmer and was thickening, I put the plantains back in for a few minutes. Then I seasoned the whole lot with salt, pepper, and garlic powder, and chowed down!


For something that's supposed to be a weed, it was quite delicious! Not bitter at all, like dandelions are; just a little chewy and spinachy-tasting. Certainly worth the brief time it took to pick and prepare them. I love making food for free.

Monday, July 11, 2011

Tomatoes and summer pickling

I have been waiting and waiting ... and waiting and waiting ... and waiting and waiting for those tomatoes to get ripe. I didn't realize how much of a tomato plant's life cycle is spent festooned with green tomatoes, none of which are remotely near getting ripe. But last week I saw a flush on one tomato, on Saturday I picked an almost-ripe one for a friend, and on Sunday we ate the first truly ripe tomato. I've picked four more since then!


These Cherokee Purples are pretty sweet, and not tart at all. That was a bit of a disappointment to me, because I like a bit of tartness in tomatoes. But they were still delicious, and John liked them too. They're big tomatoes -- good slicing, sandwich, caprese salad tomatoes. Next year I'll add some good sauce tomatoes to the mix.

Cherokee Purple tomatoes have green shoulders, even when they're ripe, and a pink-to-purple body.

My prize tomato, the biggest of them all, will be ripe soon:


I'm quite sure it's over a pound. Can't wait to get into it ... it will serve the whole family.

Speaking of which, the baby loved them too. Kept running back for another bite, and another bite, and another bite...

Whatever would I do without his help in the yard?

In other news, I've been doing a bit of lacto-fermentation again. Summer is really the ideal time to start, when the produce is coming in and there are fresh herbs to use. Lacto-fermented vegetables last a good six months in the fridge, so if you put up a lot, you can be eating your summer produce clear through Christmas. And they still taste fresh!

Last week I made this corn relish with some corn cobs that I didn't feel like eating just then, but would go bad otherwise. (When lacto-fermenting, it's really best to use the freshest produce you have. The results are much better. This time they turned out fine though!)

For the first time, I didn't have any whey, so I doubled the salt and also added some juice from last winter's kimchi. The home-grown cilantro from my garden is what really made it great. The baby ate a ton of it this morning, and even begged to drink the sour juice! I let him ... hey, it's better than sugary fruit juice. He claimed to like it and want more.


Here are some preserved lemons, leftovers from my birthday pie. Preserved lemons are the easiest thing ever. Just cut the lemons any way you like -- I sliced thinly, but many like to quarter them -- and add one tablespoon of salt per lemon. Squash them down a bit to release some juice, and top off with water. Leave out for a month.

You can see a black plastic lid in there ... I put that in to keep the lemons from floating up out of the brine. Anything that comes up over the brine is in danger of molding. So do what you have to do to keep everything submerged! A ziplock bag full of water or brine works fine too.

I have a gardening confession/tip. That is to say, if it was the right thing to do, it a tip. If it's totally disgusting, it's a confession.

Last month, someone gave me some basil and cilantro to transplant into my garden. I pulled up my (useless) Russian sage at the corner of my tomato bed and plopped the basil and cilantro into that space. (The Russian sage did survive, though I thought it wouldn't -- it now lives in a pot by my front porch.) I should have realized, though of course I didn't, that this wasn't going to work very well. The sage and the tomatoes had spent all spring depleting that soil, so it was very barren. They had deep roots, though, and were flourishing fine on the deeper soil. My new transplants, though, had barely any roots, comparatively speaking, and began to wilt after a few weeks. They were showing the characteristic paleness and yellowing of nitrogen deficiency.

I racked my brain for days trying to think of a cure I had available at home. What I really wanted was some organic fertilizer, maybe seaweed emulsion, available at the store ... but I have no car most of the time and couldn't get out to go get it. Besides, my garden goal is to spend as little as possible on my garden, because I'm doing it to save money, not just as a hobby. Especially when it's just a matter of a few herbs.

Manure would have been nice, and I found some sources on craigslist, but again, the lack of car constrained me. I didn't really want to wait for the weekend with them looking so poorly.

And then I thought of one nitrogen source everyone has. People, after all, use a lot of nitrogen. We go through it so much, we get rid of it all the time. Can you guess what I'm thinking of?

Yeah, I used the diaper rinse water. Normally I just dump the diapers in the wash, but this time I poured water over them first, diluted that water, and carefully poured it around the plants' roots.

Can you believe it? Those plants revived in a couple days and have been sending up luxuriant, dark green growth ever since. Amazing!

Now my only problem is to figure out how to keep my tomatoes from toppling over. They are getting pretty tall, and our soil turns to clay pudding when it rains. The tomato cages just don't seem to be enough. Each rainstorm, I have to go out and prop the tomatoes again. The beefsteaks, in particular, look very, very sad. Next year I'm building a better trellis!

Friday, May 20, 2011

How to roast a chicken

Lately I keep giving people the impression that I know how to cook. Okay, I kind of do, but I don't do anything hard. All my cooking is extremely simple and only uses common ingredients. So I really don't get it when people say, "Oh wow, you roasted a chicken!" or, "You made macaroni and cheese from scratch?" Seriously, these things are way easier than they look (or taste).

John was laughing at me the other night because I was talking about how simple it was to cook something. "You women are all alike," he said. "One of you says, 'This tastes good,' and the other has to say, 'Oh, but I only cooked a simple reduction sauce with an Italian white wine and then braised a single peacock's feather along with the unicorn steak.' It's like you think taste and effort are supposed to correlate in any way. How it tastes has nothing to do with how much work it took."

Anyway, so I've decided to share a few of my simplest dishes. Rather than impress with the originality of what I'm making (which I hardly ever can), I just want to be really specific so that anyone who does not yet know how to do these easy things, can do them tonight for dinner in 20 minutes. I'm starting with roasting a chicken, because it is a delicious company meal and takes barely any effort at all. Honestly, the hardest part is taking the chicken out of the freezer.

Step One: Take the chicken out of the freezer. Ideally you'd do this about two days before you need it so that it's completely thawed. If you miss this timeframe, you can thaw it in one day in a bowl of lukewarm water on the counter, or (like me) hasten it along still further by holding it under a warm tap. Yes, that's me, always holding a slippery, cold raw chicken under the tap and sloshing warm water around in the cavity. I like to be glamorous when I cook.

Step Two: Decide when you want it on the table. Do you want dinner at six? Then a five-pound chicken should go in the oven around four. The rule is 20 minutes per pound (more if it isn't completely thawed), plus 20 minutes for resting and carving. 10 minutes before oven time is when you need to get started.

Step Three: Prepare the chicken. Before you start, take a moment to think about cross-contamination. Anything that raw chicken touches will have to be washed. So a good place to unwrap it is in your sink or on an easy-to-clean surface. Sometimes I put it on some kind of tray so that I can just wash that instead of trying to disinfect the counter. During the process, you'll probably have to wash your hands several times, so make sure your soap is handy and everything else you need is ready to hand (your dish, seasonings, scissors).

Preheat the oven to 400 degrees. Or 375. Either's fine.

Unwrap the chicken from its packaging. You'll probably need scissors for that. Once it's out you can just dump the scissors in the sink to wash later; you won't need them again. Go ahead and dump any juices that come out with your chicken; it's usually just added "broth" or water. Reach up that poor chicken's behind and see if there's a bag of giblets inside. Take it out. If you want the giblets (I do; such a waste to toss them!), open the bag and see what you've got. You probably have the neck, some big blobs that are heart and gizzard (sometimes more than one of each; the manufacturers just throw 'em in at random) and a floppy, dark-colored liver. Cook the liver separately or it will share its taste with the chicken. I just tip it into a saucepan to cook on the stove. The other giblets can roast in the pan along with your chicken.

Some people say to rinse the chicken inside and out and then pat it dry. I don't, because I figure someone had to do that already when they took the feathers off. And anyway, I'm going to cook it.

Plop the chicken in your cooking dish. Here are my two extra-special super secrets that make my chicken the best I've ever had: I don't use a roasting pan, and I don't put it breast-up like everyone tells you to. I put it in a Pyrex dish. Any casserole will do. An 8x8 Pyrex will hold a 5 lb. chicken if you put it in diagonally. For a bigger bird, like a turkey, those big 9x13 pans are good. And, for the special C. family touch, put it upside-down. Or rather, the way the chicken would sit if alive, breast-down. The breast is the squishier side, and the wings will look like they're nicely folded.

There are two reasons you're supposed to put it breast-up: it's easier to carve that way, and you get crispy breast skin. But I've never had any trouble carving it breast-down (and if you do, you can always flip it over once it's cooked), and I don't care if the breast skin is crispy. (If you do, you can pull off the back skin and drape a bit over each piece of breast you serve. No one will mind, or likely even notice.) The reason I cook it breast-down is because the breast is much moister. The breast cooks faster and is drier than the rest of the chicken, so when you put it facing up, it can cook too fast and dry out. When it's facing down, it cooks more slowly and sort of braises in the juices. The white meat ends up deliciously moist and not at all overcooked. No basting or shielding or tinfoil or paper bags necessary.

Once you've got it in your pan (which probably took you about five minutes) you can season it if you want. I often dump a little olive oil on it and then sprinkle on some seasonings: salt, pepper, sage, garlic, and rosemary. Whatever seasonings you like are good. Just salt and pepper is fine -- or nothing, if you're short on time. I generally wash my hands, and then use my clean left hand for dumping stuff on and my right hand for rubbing stuff into the chicken. You can just spread your seasonings over the back, legs, and wings. It takes two minutes but does make the skin super-delicious.

Step Three: Put the chicken in the oven. Then immediately turn the oven down to 350. The extra heat will help crisp the skin a bit, and then the lower heat will do the actual cooking. At least, that's what the Joy of Cooking told me. If you're concerned about the time, you can use a higher heat, but you'll have to look elsewhere for a chart that will tell you how long you need. I only know 20 minutes per pound at 350. If I use a higher heat, I generally just have to poke at it a bit to know when it's done. Also, if your chicken's still a little frozen, you will need more time or a higher temperature.

Step Four: Take the chicken out of the oven when the cooking time is up. To know if it's done, cut into the thigh (which takes the longest to cook). If it bleeds and the meat looks raw or pinkish, it isn't done. If clear oil comes out and everything looks white, it's done. (Sometimes there's a slight reddish tint on parts of the meat that touch the bone. This may be just a stain from the bone marrow. If you're unsure, just cook it longer. It's hard to overcook a chicken.)

Or, you know, you could use a meat thermometer. I don't have one.

Let the chicken rest for 15 minutes or so (this helps it absorb its juices and be moister) and then carve it up. A serrated knife seems to work best. I generally cut it into drumsticks, thighs, wings (these are usually quite small, for a kid perhaps) and two or four breast pieces. The delicious marbles of meat on the back are the cook's treat to eat in the kitchen.

And then you eat it! There are usually a ton of drippings in the pan afterward. Pour them into a jar or measuring cup and put them in the fridge. When they separate out, scoop off the fat (schmaltz) to cook your eggs or onions in, and save the broth for soup. Have everyone save their bones, and after dinner you can start some chicken stock going to be ready by tomorrow's dinner.

To make this a full meal, you can start some rice or potatoes and a vegetable a few minutes before the chicken comes out of the oven, and they should all be ready at the same time.

Preparation time: about half an hour. Total time: two hours and change. If you make it for company, you can pop it in the oven before they come, spend a couple hours eating hors d'oevres and chatting, and then when the house begins to smell delicious, you bring out this fantastic chicken and impress everyone.

At which point, I guess, you tell them, "It's so simple; I simply caught a phoenix on my way to the grocery store and then braised it in the milk of a minor goddess." Something like that.
Related Posts Plugin for WordPress, Blogger...